I built a study app over a weekend. No coding experience. No developer. Just vibes.
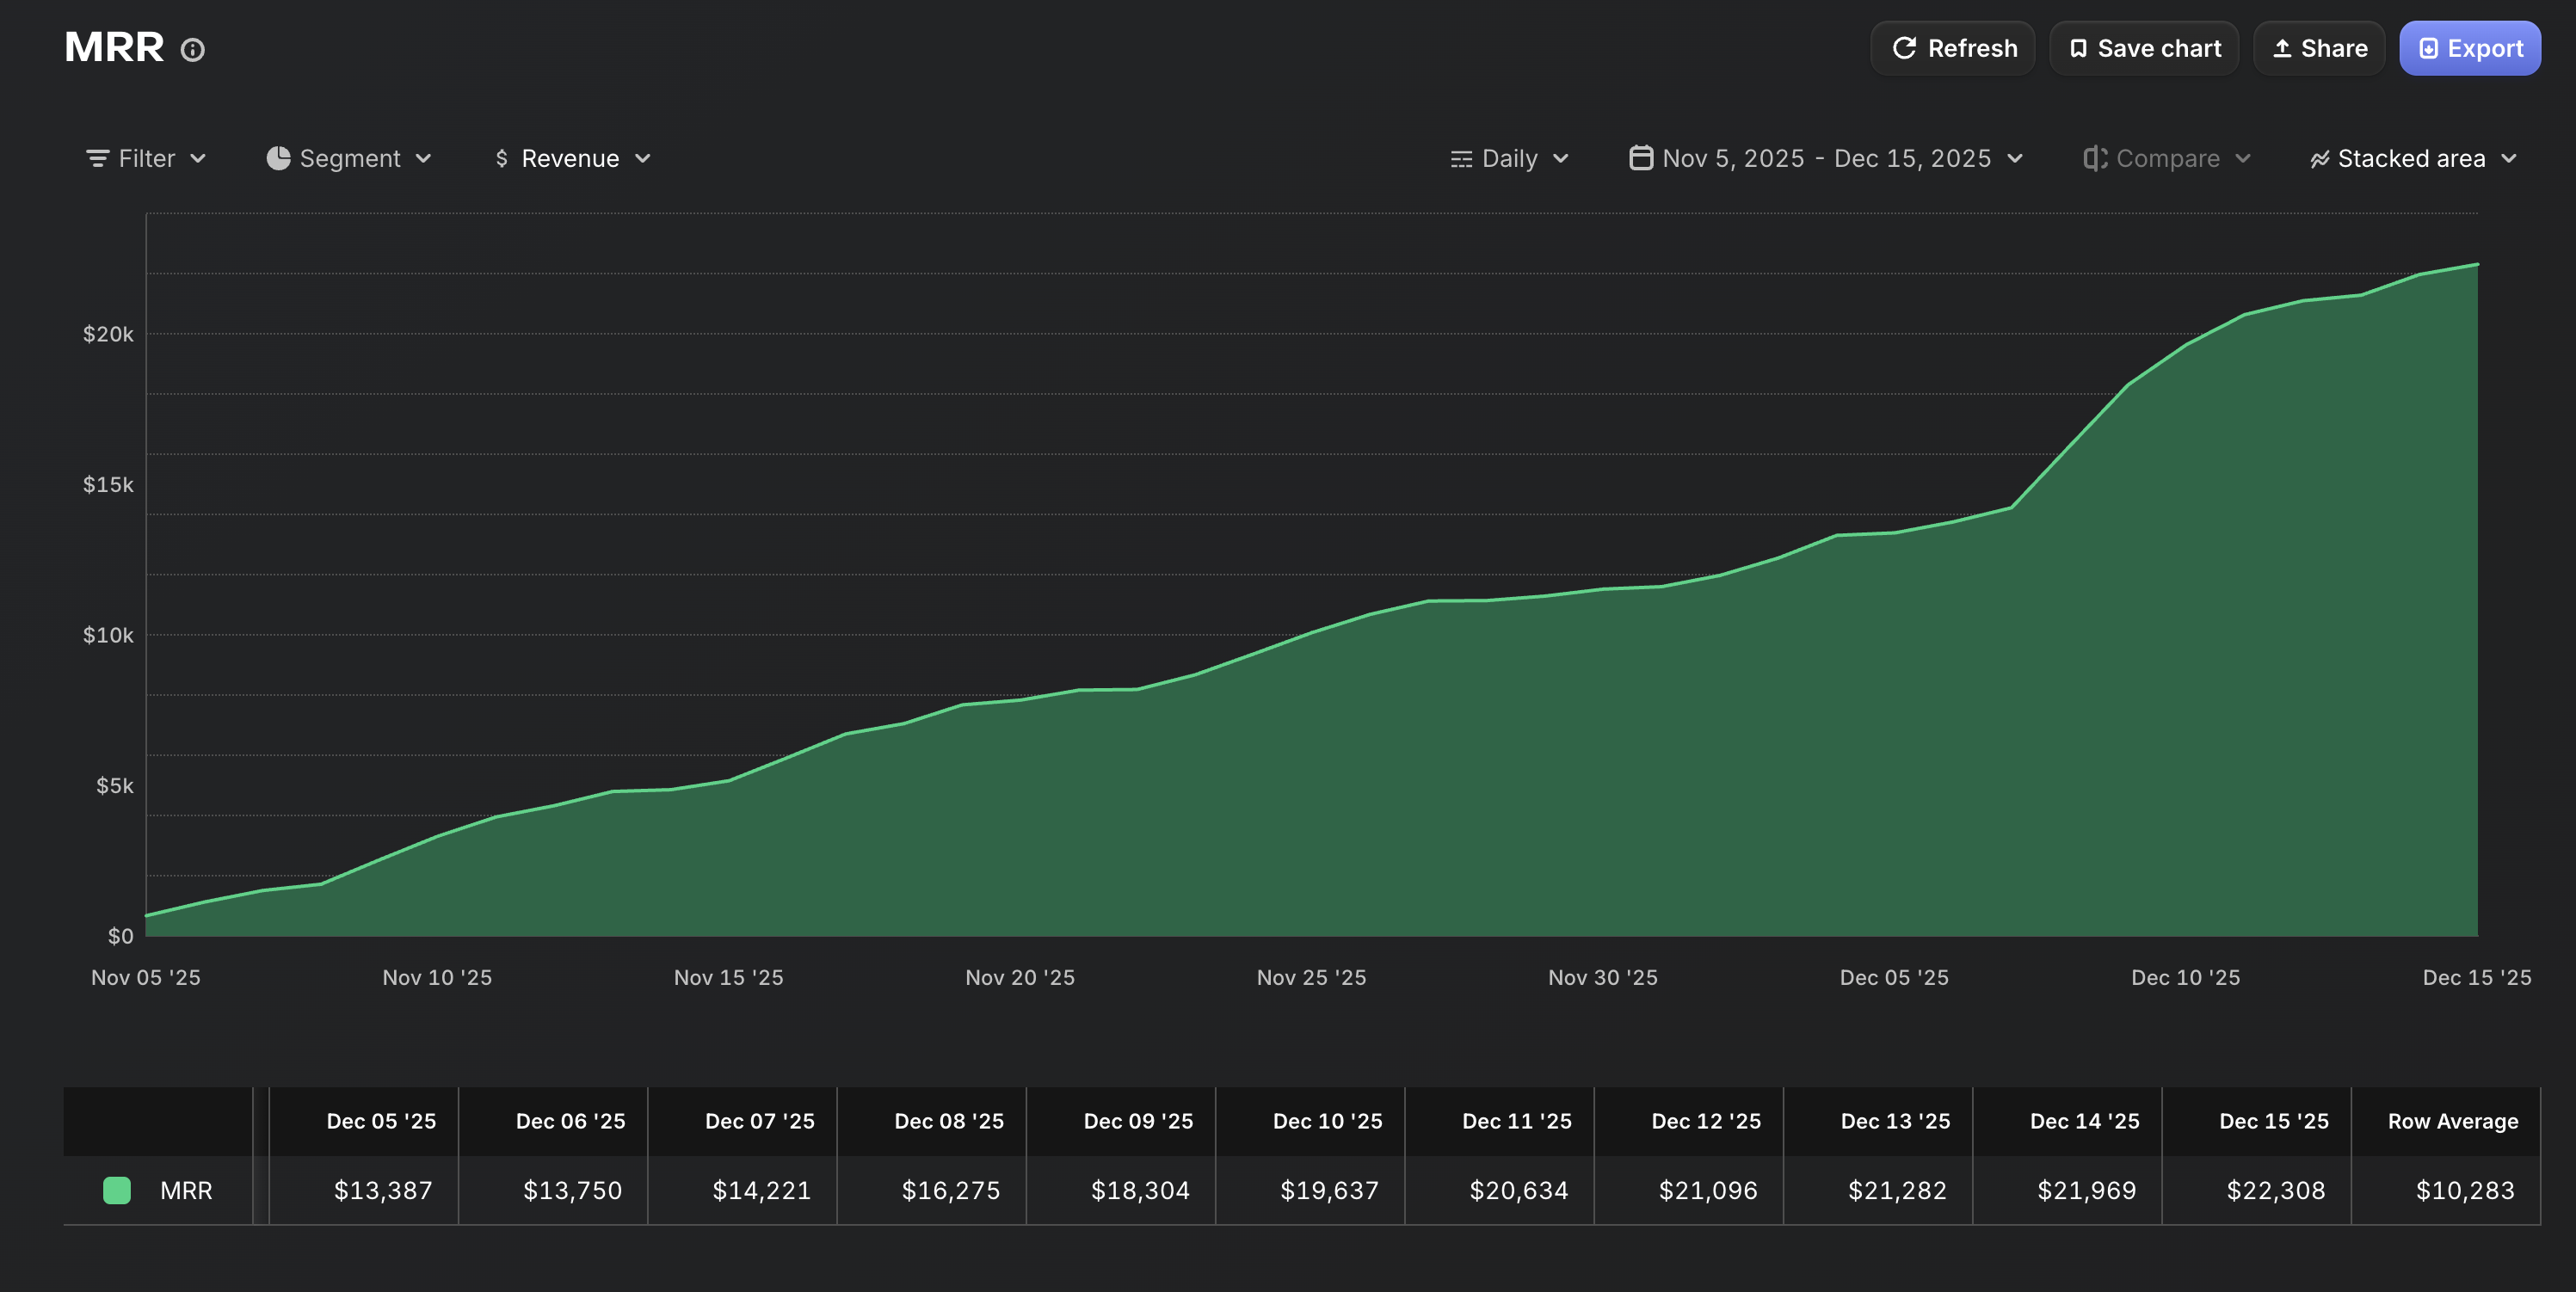
7 days later it was live on the App Store. 30 days after that, it was doing $25,000/month in recurring revenue.
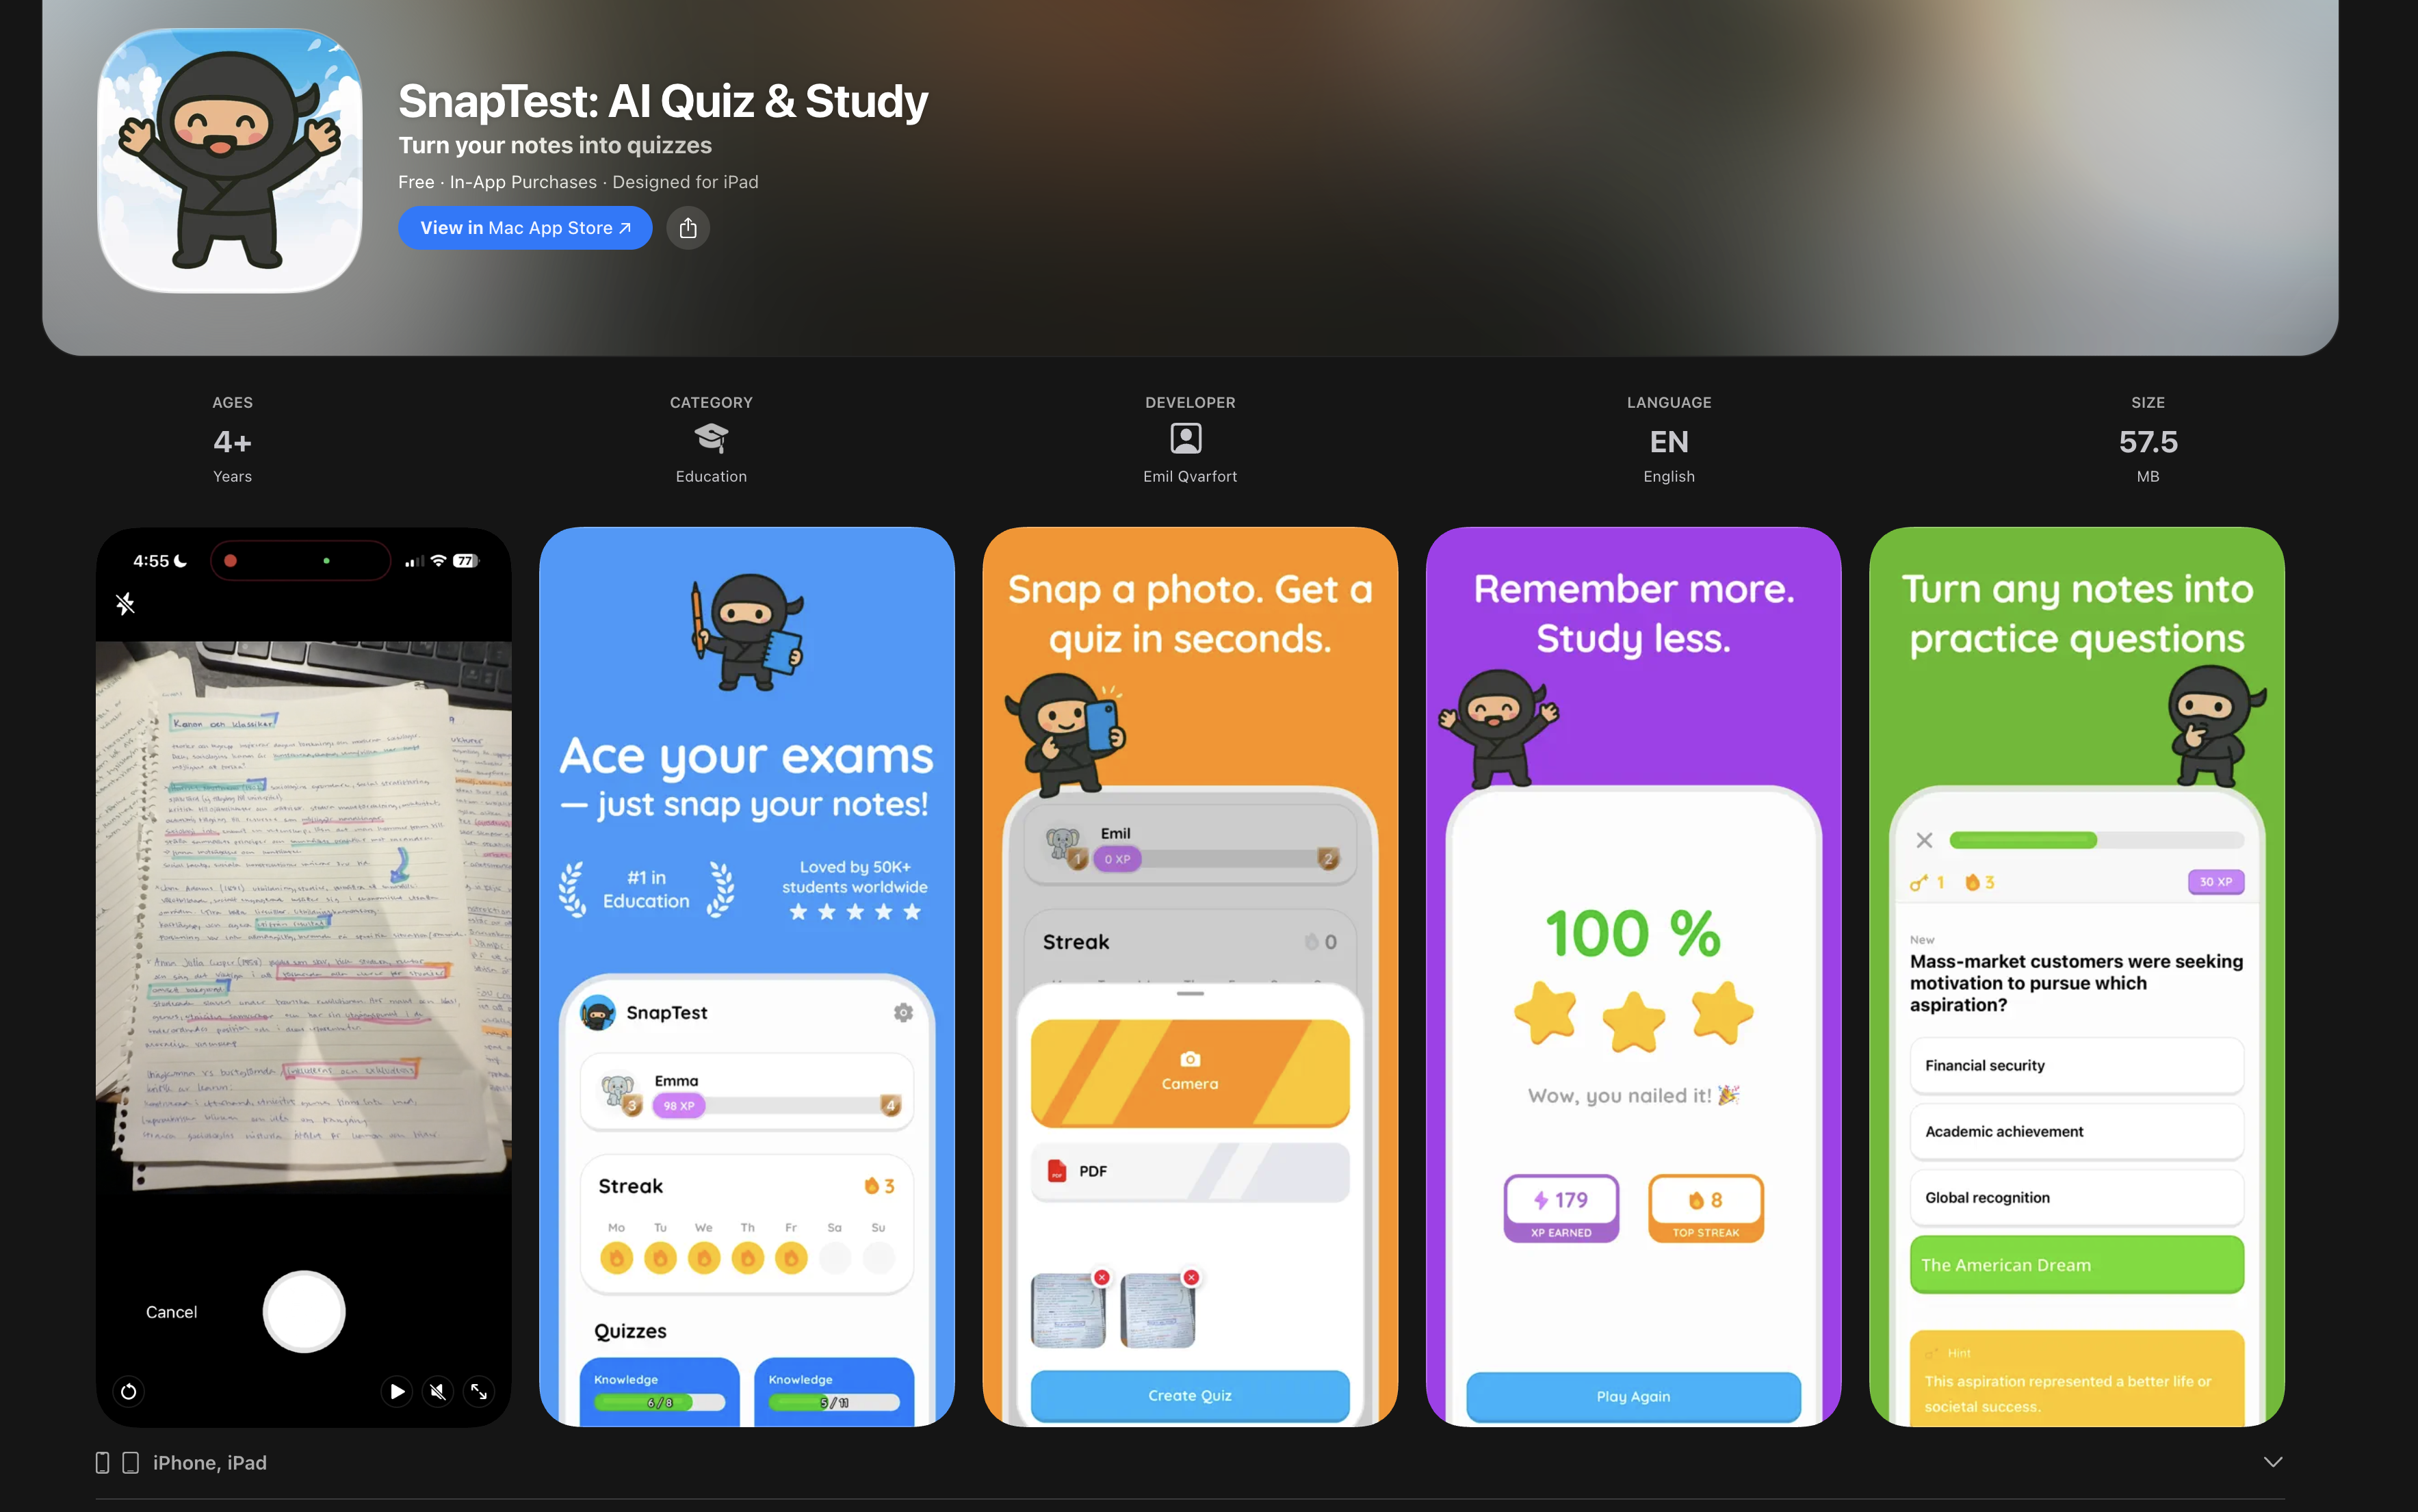
The app is called Snaptest. Users take a photo of their handwritten notes and it turns them into fun, engaging quizzes. Simple idea. Simple execution. Printed money.
Now I'm repeating the process — building an entire portfolio of apps using the same blueprint.
This guide is the exact process I follow. Every step. Nothing held back.
The #1 Mistake That Kills Vibe Coded Apps
Here's what most people think vibe coding looks like:
Open Claude Code → type "build me an app that does X" → get a working app → profit
This is fantasy. And it's why 95% of vibe coded projects end up as broken prototypes that never launch.
The truth? 90% of vibe coding happens before you open Claude Code. The people who fail skip the planning. The people printing money have a complete blueprint before they write a single prompt.
One prompt doesn't build an app. A plan does.
The Blueprint: 5 Steps From Idea to Revenue
01 Find a Problem Worth Solving
Don't start with "what app should I build?" Start with "what problem are people already trying to solve?"
How I found Snaptest:
- They were already making flashcards manually (Quizlet, Anki)
- School is super boring and they struggle with procrastination
- The gap: A fun way to study that feels like magic
- The pain was real, specific, and recurring (every student, every exam season)
Your action items:
- Browse r/SomebodyMakeThis, r/AppIdeas, and TikTok comments for problems people describe
- Look for manual workarounds — when people duct-tape 3 tools together, that's your app
- Validate in 10 minutes: search the App Store. If similar apps exist with bad reviews, you found your opportunity
- Write ONE sentence: "My app helps [who] do [what] without [current pain]"
The rule: If you can't explain the app in one sentence, it's too complicated. Kill it and find something simpler.
Snaptest: "Helps students turn handwritten notes into fun quizzes instantly." 8 words. That's it.
02 Plan the Entire Product BEFORE You Prompt
This is where 95% of vibe coders fail. They jump straight into Claude Code and start prompting without a plan. Then they get lost in a maze of half-built features, conflicting code, and an app that does 20 things badly instead of 1 thing perfectly.
a) The feature list (keep it TINY)
- List every feature you think your app needs
- Now cut it in half
- Now cut it in half again
- What's left? That's your MVP
For Snaptest, the entire v1 was:
- Take a photo of notes
- AI extracts the content
- Generate a quiz
- Let the user take the quiz
- Show their score
That's it. No social features. No leaderboards. No study streaks. No flashcard mode. Just the core loop: photo → quiz → score.
b) The screen-by-screen flow
- Sketch every screen on paper (yes, paper)
- Draw arrows showing how the user moves between screens
- Every screen should have ONE job
- Count your screens. If it's more than 5–7 for an MVP, you're overbuilding
c) The tech decisions
- What platform? (iOS, Android, web, or all)
- What AI model do you need? (vision, text, both)
- Does it need a backend/database, or can it work locally?
- What's the payment model? (subscription, one-time, freemium)
Write this down. All of it. Before you touch any tool.
- Write your feature list (5 features MAX for v1)
- Sketch every screen on paper with arrows between them
- Decide: platform, AI model, backend yes/no, payment model
- Write it all into one document — this becomes your prompt blueprint
03 Build It in One Focused Session
Now you open Claude Code. But you don't type "build me an app." You feed it your plan.
a) Start with the big picture
Give Claude Code your entire plan first. The feature list. The screen flow. The tech decisions. Let it understand the FULL picture before it writes a single line of code.
Example first prompt:
"I'm building a mobile app called [name]. Here's what it does: [one sentence]. Here are the screens: [list]. Here's the tech stack: [details]. Here's the feature list: [list]. Build the foundation first — project structure, navigation, and the main screen flow."
b) Build screen by screen
Don't try to build everything at once. Go screen by screen:
- Get the first screen working and looking right
- Move to the next screen
- Connect them
- Repeat
c) Be precise with every prompt
"Make it look better"
"Change the quiz card background to white with 12px rounded corners, add a subtle shadow (0 2px 8px rgba(0,0,0,0.1)), and increase the font size of the question text to 18px semibold"
"Add a camera feature"
"Add a camera button on the home screen that opens the native camera. After the user takes a photo, send it to GPT-4 Vision with this prompt: 'Extract all text from these handwritten notes and return it as structured bullet points.' Display the extracted text on a new screen with a 'Generate Quiz' button."
The more precise you are, the less time you waste fixing things.
d) Test constantly
After every major feature:
- Run the app
- Try to break it (tap things fast, enter weird inputs, go back and forth)
- Fix what breaks before moving on
- Don't stack features on top of bugs
- Feed your complete plan to Claude Code as the first prompt
- Build one screen at a time, test each before moving on
- Be specific in every prompt — describe exactly what you want
- Reserve the last 2–3 hours for polishing (animations, loading states, error messages)
04 Ship Fast, Ship Ugly
Your app doesn't need to be perfect. It needs to be on the App Store.
"Ready to ship" means:
- The core feature works reliably (photo → quiz → score)
- It doesn't crash on the common paths
- It looks decent (not beautiful, decent)
- It has a name, icon, and App Store screenshots
- The payment flow works (this is non-negotiable — test it 10 times)
"Ready to ship" does NOT mean:
- Every edge case is handled
- The design is pixel-perfect
- You have 20 features
- You've spent 3 weeks "polishing"
Speed matters more than perfection. Every day you spend "making it better" before launch is a day you're not collecting revenue and learning from real users.
- Test the complete user flow 10 times end-to-end
- Test the payment flow (subscription purchase, restore, cancel)
- Create an app icon (use AI image generation — Midjourney, DALL-E)
- Take 4–6 App Store screenshots showing the core feature
- Write a 2–3 sentence App Store description focused on the benefit
- Submit and move on to marketing while you wait for review
05 Market It Like Your Life Depends on It
The app is live. Now the real work begins.
The app is 20% of the work. Marketing is 80%. I've seen great apps die with zero users and mediocre apps print money because the founder marketed relentlessly.
What worked for Snaptest (0 to $25K MRR in 20 days):
a) Go where your users already are
- Students are on TikTok and Instagram
- We created short videos showing the "magic moment": photo of messy notes → instant quiz
- The visual transformation is the content — no explanation needed
b) Make the app demo THE content
- Don't make ads. Make demos.
- Screen recordings of the app in action are more compelling than any pitch
- The format: show the problem (messy notes) → show the solution (beautiful quiz) → CTA
c) Volume wins
- Post every single day
- Different hooks, same core demo
- Most posts will flop. Some will pop. You can't predict which.
- The ones that work, double down on that format
d) Leverage the "I built this" story
- "I'm 19 and I built this app over a weekend" is a compelling narrative
- Behind-the-scenes content (showing Claude Code, showing the process) builds audience
- People root for young builders. Use it.
- Identify the 1–2 platforms where your users spend the most time
- Create 5 "magic moment" demo videos showing the core feature
- Post daily for 30 days minimum — track what formats get the most engagement
- Tell your build story (people love "I built this with AI" narratives)
The Quick Win: Do This in the Next 5 Minutes
- Open your notes app
- Write ONE sentence: "My app helps [who] do [what] without [pain]"
- List 3–5 features MAX
- Sketch 5 screens on paper
You now have more of a plan than 95% of people who try vibe coding. The rest is execution.
Cheat Sheet
| Phase | Time | Key Rule |
|---|---|---|
| Find the problem | 1–2 hours | If you can't explain it in one sentence, it's too complicated |
| Plan everything | 2–4 hours | Every screen, every feature, on paper BEFORE you prompt |
| Build it | 1–2 days | One screen at a time, test constantly, be precise |
| Ship it | 3–5 days | Done is better than perfect. Get on the App Store. |
| Market it | Ongoing | The app is 20% of the work. Marketing is 80%. |
What's Next?
This blueprint got me to $25K/month with one app. Now I'm using the same process to build an entire portfolio.
If you want to follow along as I build more apps in public — including the exact prompts, the marketing breakdowns, and the revenue numbers — follow me on X. I share everything.
Built with zero code, zero experience, and one weekend of focus.